Showing posts with label thrifty. Show all posts

Friday, March 23, 2012

This and that

I have nothing sewing-related to show you, unfortunately. So how about everything else in my camera? Maybe see what else I've been up to recently?

Cute baby in a bath. You are welcome. 

My Dad and his grandkids. I love this picture.


Mom2Mom season is back! I will be going out tomorrow, and a couple of weeks back, I rounded up this loot at a sale. I think I spent $14 for all of this.

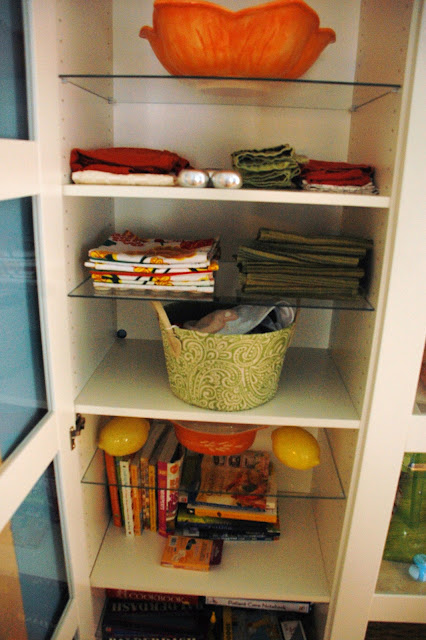
When my friends Martin and Michelle moved to Germany, they didn't want to take this cute Ikea shelving unit. So I bought it from them for a very reasonable price. I honestly don't know how I lived without it. Not only does it fit perfectly in my dining room, but it is holding all sorts of things that before were crowded up my drawers and cabinets. 

Napkins, bibs (in the basket), cookbooks, huge salad bowls -- everything has a place now!

I found this cute orange Pyrex at an antique store. 

The other side. I love having my KitchenAid on display. Let's be honest, that baby is a work of art. It deserves a spot in a display case.

Moving on, I bought this cute pre-ruffled black and white fabric and can't figure out what to do with it. Pillow? Cute baby dress? Ruffly scarf? Ideas, please!

Do you need anything around your place fixed? I'll send him right over. 

Have a nice weekend! I have the very best intentions of actually sewing. Hopefully will have something to show you soon.

Wednesday, December 7, 2011

Merry and bright... and really really busy

Sorry I have been a bit MIA. It's that time of year. I'm sure you're feeling it, too. So many things to do during the holidays. Does anyone else wonder why we try to cram so much into a few short weeks?

The last few years, I've taken a week off in early December to try and get all my shopping, decorating, mailing and baking done. I am now working just part-time, but decided to keep the tradition alive. It's nice to have so much out of the way early in the month. So I have been off for an entire week now and don't work again until Sunday. I wish I had more sewing done in this time to show you, but mostly, I've just been checking other holiday stuff of my to-do list.

Here's a big ol catch up post to show you what I've been up to. 

We got the tree up yesterday! We get a real tree. I love it but man, it's a lot of work. Getting the tree is truly an all-day affair, and we're not chopping it down or anything. Just picking it up in nearby parking lot. But anyway, it's up and I love it.

 I made this wreath yesterday. Super easy. We can't do a green wreath anymore since we painted the door green this summer. So I thought red might be nice. All I did was wrap a wreath form in red yarn, hot glue some small ornaments in one corner, and attach a wreath bow in the other. I plopped that twig of silver balls in for the last touch. Super fast to make and cost about $12 for all the supplies (I already had the wreath form.)

On Saturday, my Mom and Aunt and I went shopping in Detroit. It was a great day. I'm still planning to show off the stuff I bought at the Detroit Urban Craft Fair!  I forgot to take photos all day though, except for this festive light display in a store front downtown. So I need to snap some shots of what I bought, then I'll post!


On Sunday night, we took the kids to the Wayne County Lightfest. Which mostly, they slept through. But it was something I've been wanting to see for years. It's a 5-mile long road with more than a million Christmas lights set up in elaborate displays. It's about a 30-minute drive for us, but worth it. I hope when the kids get older they enjoy it more.


 On Monday, we hit up the mall to see Santa. If you want a professional photo with Santa, it's $30 at our mall. Or it's $5 if you want to take your own. An easy decision, if you ask me!


I also made our Christmas cards. I feel like a flipping genius this year, because I made this custom photo card and printed 75 of them -- for $5! I just used Picasa to make a collage and Snapfish to order .09 cent prints, which I might stick to a piece of cardstock. Or not. I am pretty excited about this though. $5?? I feel like an idiot for ordering such expensive cards in past years!


I've been working on a tutorial for the Scarflette! I hope to have it finished next week, which still leaves some time to make one or two or five for your friends for Christmas. Stay tuned!


And tomorrow, my ornament will be featured in the Sew Woodsy 12 Days of Christmas event! I thought I was Friday, but nope, it's tomorrow. This is actually the back of my ornament. Just wanted to give you a sneak peak.

So that's what I've been up to. How about you? Are you ready for Christmas?

Wednesday, November 16, 2011

Announcements and what have yous

I was really excited to see how many others are loving the vintage sheet trend. Always nice to know you're not alone. I'm definitely going to be sewing with my sheets in the near future. So stay tuned for that!

OK, two quick announcements. I joined Google+ yesterday. Is anyone actually using this social network? Seems like, mostly, no. But I had training at work and was encouraged (ahem) to join, so I'm there. If you're on there, leave me a note and I'll add you to my circles. Or whatever the lingo is. :)

And finally! Guess what? I'm taking part in a fun event in December. Katie from the blog Sew Woodsy is having a 12 Days of Christmas handmade ornament event and asked me to participate. Today she announced the event and the full line up of bloggers. I'd really honored to be included and will be checking out all the other participants' blogs soon! Look for all the handmade ornament goodness starting on Dec. 1. Yeehaw!

button


And because every post needs a good photo or two.... Check out these finds from an antique store I was in last week or so. I didn't get anything -- not the fabric or the vintage buttons. Mistake?!?


I seriously might go back for the fabric. If only the antique store wasn't a good 45 minutes away....

Monday, November 14, 2011

My newest obsession: Vintage sheets


I'm becoming a bit obsessed. With what you see above. Fun, colorful vintage sheets. I first bought one in the spring, to make the spring wreath from In Color Order.  I made the wreath, loved it, and then used some of the remaining sheet to make a spring skirt. 


Jen's blog, by the way, is almost solely to blame for my obsession. Every week or so, Jeni will post a photo of the new sheets she has rounded up to sell in her etsy shop. Every week, I marvel at how awesome her finds are. I started to wonder whether the same awesome sheets lurked in thrift stores near me. Huge pieces of cute fabric for one or two dollars? Then I read her guide to finding the sheets. The desire to conduct a hunt of my own grew. Even though I have no real reason for it. She's got a shop to stock. I have nothing so practical. But I was a goner. I wanted those sheets.


So my hunt has begun. It's really not very hard to find them. And they make me so happy. It's absurd, really. This one above is my favorite find so far. Scroll back to the very top and you can see a bunch I found this week in one Salvation Army.

I've been rounded up projects on Pinterest that use vintage sheets. I get that you can replace any standard fabric in whatever project you want with a vintage sheet. But I like seeing the projects that are made with these gems in mind. It's my favorite pin board right now. Here are some of the standouts.


Are you feeling inspired yet? Have you crafted with vintage sheets? And how much luck do you have when hunting for them in your local thrift shops?

Linking at...


Sew Happy Geek

Tuesday, October 11, 2011

Easy DIY Halloween costume, take two

Are you ready for the easiest DIY Halloween costume ever?

And dare I say, one of the cutest?

Here it is!


Charlie Brown!

This was Luke's costume when he was 1. I can't even remember him being this small. Crazy. But wasn't he a doll? Let me tell you, if you have a smallish boy, you should really consider Charlie Brown. It's just so nostalgic and cute. Tons of compliments will flow your way, believe me. And it's very simple.

Step one: find a yellow T-shirt. I got mine at a thrift store.

Step two: Use a Sharpie to draw a big zig-zag along the bottom of the shirt. Or if you want to be a little extra crafty, cut a zigzag out of felt and sew it on. I didn't know how to sew back then, so I took the easy route.

Step three: Use an eyebrow pencil to draw a curlicue on his forehead.

Step four: Pair this with dark pants, a football and whatever under-the-T layers you need to keep your kid warm.

Done!

Super fast, super cheap, super cute and memorable.


Saturday, October 8, 2011

Handmade Halloween, no sewing required!

The last two years, I've made Luke's Halloween costumes, and I really haven't sewn a thing. By strategically picking what he was going to be and then combing thrift and resale shops, I was able to make cute, unique costumes that didn't require much stitching at all.

Wanna see? First up, last year's costume.


Last year, Luke went as a Mounty. I assume most people know what a Mounty is, but perhaps it is more known to us Michiganders and others who border Canada.

Here's a real Mounty -- also known as the Royal Canadian Mounted Police.


To make this costume work, the biggest thing I needed was the red coat. I totally lucked out. I found the red coat at a Mom2Mom sale for $8. I really thought it was perfect. I had to look at a few sales before finding it. So worth it!

After that, the most important piece was the right hat. I wound up finding this hat at a thrift store. It was a ladies hat and had a band of leapord print fabric around it. I snipped that off and used a black hair thingy to make it look more Mounty-ish. Then I added a fabric strip to the inside to make it fit on Luke's small head better, because it's really a full-sized adult hat. I simple stapled the strip, which was smaller than the actual hat depth, to this flappy piece of lining inside. Then it would then sit perched on his head and not fall into his eyes.


It's tough to see, but the Mounty pant is a black pant with a yellow stripe running down the side. Which, I just happened to have a pair like that! So that was easy.


The boot gave me trouble. I looked everywhere for a boy's brown boot. Nothing. Seriously, nothing. Not at the Mom2Mom sales, the thrift stores, Target, the Halloween stores, nothing, anywhere. Apparently brown boots are a girl thing. So I wound up buying a used girls' pair for $4 and covered the flowers on the side with an old sock. I just cut the toes off the sock.


A leather belt went around his waist and then I cut a brown canvas strap off an old bag to make the strap that goes across his chest.

I added some yellow fabric circles to the top of the coat, trying to mimic some details from the real Mounty coat.

Ug, my camera was messed up last year and all my photos are blurry!
I did sew him that small Canadian flag to carry around, just to reinforce the idea. I think it helped. I used a chopstick for the handle. And a friend gave me that toy horse! What's a Mounty without his royal stead?


Cute, right?

This has gotten long, so I'll save the other costume for a new post. It's a really, really simple costume that got TONS of compliments. And it's great for last minute.

Linked at...
 
Weekend Bloggy Reading

Wednesday, September 28, 2011

I have money to spend!

A month or so ago, I was delighted to sign into flickr one day and see a two-week old message from Pink Chalk Fabric Studio. They liked my Outside Oslo pillow, which I'd uploaded to their photo gallery, and wanted to include it in their newsletter. They wanted my permission. There was one decision I didn't need to think about long -- especially because when you're featured, you get a $20 shop gift certificate to use! Score!

So I have $20 of fabric money burning a hole in my virtual pocket. It's hard enough for me to pick fabric when I'm somewhere like Jo-Anns. Online is so much tougher! The shops are so well stocked with everything cute ever made, ever ever ever. Or so it seems.

I pinned a few of my favorites. Please tell me what you like. (All can be purchased, obviously, at PinkChalkFabrics.com) What would you spend $20 on?

My mother-in-law wants a Christmas apron. Here are a few fabrics I could snag for that project.

Dena Designs Kumari Garden Holiday Sanjay
Kate Spain Flurry Snowfall Red Ribbon
Michael Miller Holiday Calico Trees Multi


Or I could hit up the sale fabric. I do love sales. These are all on sale.

Alexander Henry Rivoli Floral Salmon
Not sure what I'd do with that one. Maybe another Go Anywhere bag?
Anna Maria Horner Little Folks Coloring Garden Sea -- Voile
Or this one. Voile is not something I'm familiar with. Maybe sleep shorts?

I am also a tad ga-ga for this new listing.
Dena Designs London Somerset Blue
So, what would you buys?

Of course, I could always be really practical and get something solid. Or a pattern to use again and again.

Help a girl out! What's your favorite?

Wednesday, August 17, 2011

Idea for displaying kiddie art

First things first: If you haven't entered my giveaway for a cute handmade pouch and vintage-sewing-pattern-coaster, hop over here to do so! 

A few weeks ago, my mother-in-law and I were discussing ways to corner off my sewing nook from the rest of the basement. I was thinking curtains. She brought up a room divider. She said she'd always wanted one at her old house, where the dining room was set right off the kitchen. She thought it would be nice on Thanksgiving to pull it out, especially one of the dividers with built-in picture frames.  That way, she could hide the mess in the kitchen AND showcase pictures from Thanksgiving of yore. Cute idea, right? And for my purposes,  it would be a little less tacky (OK, a lot less tacky) to have a room divider than a bunch of Ikea curtains hanging from clothespins from my basement ceiling, right?

I agreed. But I already had the curtains. And I'm nothing if not impatient. So the idea was tabled.

That was until two days later. On the way home from working out, I passed a garage sale. Naturally, I pulled over. Can't pass a garage sale if I have cash in my pocket and no kids in my car. I wandered up and looked at a few tables before I saw it -- a room divider! Not just a room divider. A heavy wooden one with the very sort of picture frames my MIL had dreamt about!

Crazy, right?

Better yet, the price tag was $3.

$3!! Are you kidding? I just did an Amazon search and saw similar dividers that cost between $150 and $200.

I got my $3 out sooooo fast and got out of there before he could change his mind.

I wasn't sure what I was going to do with it until it dawned on me. Kiddie art! No longer will I be all, "Where do I put this.... interesting... scribbled.... mess.... I mean, work of art?" Now I know!


The watercolors are Luke's, with a helping hand from Uncle Matthew. The black and whites are Luke's photography.

HAHA. Just kidding. Apparently I need more kiddie art.

But I'm excited to fill the whole thing up, and I know that'll be easy with preschool starting soon. Now my sewing nook is a little more contained and I have a nice way to display my kid's art. All for $3. If you were here, you could totally five-high me now.

Since I am not the only one with brilliant art displaying ideas, I went on Pinterest to find more inspiration for you. You're welcome.

Take a looksie.

Source
Source
Source
Source
How do you display your kiddie art? Or maybe a more appropriate question here: if your sewing space is out in the open somewhere like your dining room, do you do anything to "hide" it?