I trekked to the book store yesterday to return a book I received for Christmas. I hightailed it right to the sewing books, pulled five or six off the shelves and sat in a chair for 30 minutes thumbing through them, trying to decide which one to buy. They all had great looking projects in them; how I wish I had $100 or more to just drop on new sewing books. But I finally decided on this one:
1-2-3 Sew, by Ellen Luckett Baker of the great blog The Long Thread. I like the progression of projects and the way they help you build your skills. I could use some work on my skills. There are a few projects inside I'm particularly excited about.
The Circle Floor pillow, Pleated Satchel, Yo-yo Scarf and Initial Blanket are tops on my list. Aren't these all so cute? And each project would expand on my skills since I've never done reverse applique, a heavily pleated projects, any fabric yo-yos or even a basic blanket stitch. I have lots to learn!
Did you get a new source of sewing inspiration over the holidays? There are so many great books out there, do share which one is topping your list right now!
Showing posts with label sewing bucket list. Show all posts
Tuesday, January 3, 2012
2012 Sewing Inspiration
Sunday, August 21, 2011
Three Little Birds Mobile
I've been dreaming about making JJ a bird mobile for his "Three Little Birds" nursery for almost a year now. And yay! It's finally crossed off my bucket list.
It's just a striped cloud with three birds. I also made a tree, a small sun and a heart, but decided not to string them up. I'm liking the simplicity of just the birds and the cloud.
Here's the crib with the cute new mobile, sans baby.
And here it is, even cuter still, with the cute baby thrown in.
It's too bad that I waited so long to make a mobile that said cute baby refuses -- just refuses -- to lay on his back and coo at it.
He'd rather sit.
And smile at me through his crib.
And just stare lovingly at me. I get a lot of lovingly stares these days. And let me tell you -- it feels GOOD.
So maybe he won't enjoy it as much as he would have had I done it months ago. Oh well! It still makes me really happy to see these happy birds above his crib. Oh maybe that's just the endorphins from all the loving stares.
PS. The bird pattern came from the bird mobile in the book One Yard Wonders. It was perfect! Although one of my birds looks slightly coo-coo, and not in a bird way. Like a crazy way. Maybe you can spot him! Anyway, that was my mistake, not the pattern's.
Linked at...
Labels:
family,
home decorating,
kids crafts,
sewing,
sewing bucket list,
stuff I made
Tuesday, July 19, 2011
Superhero third birthday party!
For Luke's birthday, I'd long imagined a "Superhero" theme. I don't know why, he doesn't even like superheros. Or know a single superhero by name. To be honest, I think it started when I sewed him a "Super Luke" cape a few months ago. I've been meaning to blog about it ever since, but I never had a photo of it I liked.
Ug, I still don't like it! This one was taken a couple of months ago, and I suppose I should just snap a new one already. Oh well. So, I made him this cape with a big "L" in it, and he loved it. He had been having a lot of fun "flying" around the house. I thought it would be a cute idea for a party. Then I envisioned all his friends wearing their own special little capes. And my brain almost exploded with the thought of all that cuteness, and I had to make it so.
So. This is how I spent last week, leading up to the party on Sunday.
Making eight capes!
I know that seems ambitious, but these were really so easy. I'd call them 10-minute capes.
The key was finding this fabric. It's a knit, and it doesn't curl up after it's been cut. It's a thin, cheap, polyester that was like $8 a yard a Jo-Ann. Enter a 50% off coupon and I had enough fabric to make all the capes for about $10.
Since it didn't fray, all I did was cut each cape out, and sew the top down to create a encasement for the ribbon ties. At one point, I wanted to make cotton ties, but duh, ribbon is easier! So ribbon it was. It was my first time sewing with polyester, but it wasn't as hard as I thought it might be. It's slippery and all that, but I just took it slow. I used a ballpoint needle and a stretch stitch -- first times for both.
Then I slipped the ribbons through and sewed them into place along the sides. For the letters, I printed them off my computer, and traced them backwards onto Wonder Under, which had been already fused onto the wrong side of my fabrics. After that it was as simple as cutting them out and ironing them on.
Times eight. I worked on these little by little all week and finished the last about an hour before the party started. I am such a deadline oriented task-finisher.
Yay for last minute inspiration!
The cupcake toppers I made by hand using scrapbook paper, glue, scissors and print outs of the words "L:uke!" 3!" Pow!" and Boom!" from my computer. Oh, and toothpicks. They took a while, but they made for a cute superhero cupcake display.
The cupcakes were store bought about four hours before the party when I realized there was no way in hell I'd ever get everything done, and I needed to give up the desire for homemade. $47 well spent.
The kids did a superhero craft -- they made little superhero masks. I cut the masks out of white felt, hot glued elastic on and bought an array of decorations. Fabric markers, foam stickers and little sticky gems.
I think the kids really liked this.
I liked how it occupied them for a whole 10 minutes!
Here's Luke's buddy Henry in his superhero getup. It was so cute to see the kids all dressed up. Have I said cute enough times yet in this post? Cute.
Cute? Cute!
This was a very cute 60 seconds to watch. Cute, cute, cute.
Last on my crafty to-do list was this shirt. Just some simple applique! I did the hand-embroidery in yellow around the outside of the blue shape. Hard to see. Cute? Yes! But not that look on his face. I don't remember why he was sad at this point, because really, the day was a blast.
Or more like.... BLAST!
Ug, I still don't like it! This one was taken a couple of months ago, and I suppose I should just snap a new one already. Oh well. So, I made him this cape with a big "L" in it, and he loved it. He had been having a lot of fun "flying" around the house. I thought it would be a cute idea for a party. Then I envisioned all his friends wearing their own special little capes. And my brain almost exploded with the thought of all that cuteness, and I had to make it so.
So. This is how I spent last week, leading up to the party on Sunday.
Making eight capes!
I know that seems ambitious, but these were really so easy. I'd call them 10-minute capes.
The key was finding this fabric. It's a knit, and it doesn't curl up after it's been cut. It's a thin, cheap, polyester that was like $8 a yard a Jo-Ann. Enter a 50% off coupon and I had enough fabric to make all the capes for about $10.
Since it didn't fray, all I did was cut each cape out, and sew the top down to create a encasement for the ribbon ties. At one point, I wanted to make cotton ties, but duh, ribbon is easier! So ribbon it was. It was my first time sewing with polyester, but it wasn't as hard as I thought it might be. It's slippery and all that, but I just took it slow. I used a ballpoint needle and a stretch stitch -- first times for both.
Then I slipped the ribbons through and sewed them into place along the sides. For the letters, I printed them off my computer, and traced them backwards onto Wonder Under, which had been already fused onto the wrong side of my fabrics. After that it was as simple as cutting them out and ironing them on.
Times eight. I worked on these little by little all week and finished the last about an hour before the party started. I am such a deadline oriented task-finisher.
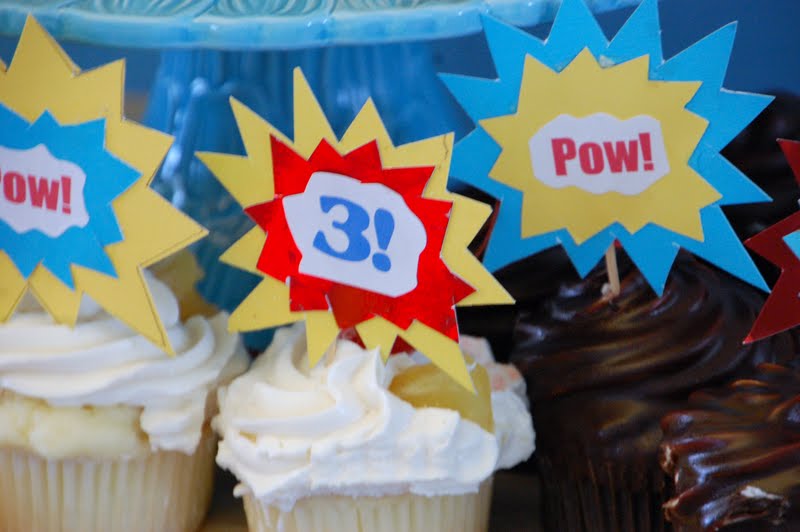
Speaking of last minute.... this wreath was totally that. I had started this wreath for something else, so it was already wrapped in the red fabric with the blue ribbon embellishment. About 10 minutes before guests were to arrive, I realized I had a few extra cupcake toppers and hot-glued them into place.
Yay for last minute inspiration!
The cupcake toppers I made by hand using scrapbook paper, glue, scissors and print outs of the words "L:uke!" 3!" Pow!" and Boom!" from my computer. Oh, and toothpicks. They took a while, but they made for a cute superhero cupcake display.
The cupcakes were store bought about four hours before the party when I realized there was no way in hell I'd ever get everything done, and I needed to give up the desire for homemade. $47 well spent.
The kids did a superhero craft -- they made little superhero masks. I cut the masks out of white felt, hot glued elastic on and bought an array of decorations. Fabric markers, foam stickers and little sticky gems.
I think the kids really liked this.
I liked how it occupied them for a whole 10 minutes!
Here's Luke's buddy Henry in his superhero getup. It was so cute to see the kids all dressed up. Have I said cute enough times yet in this post? Cute.
Cute? Cute!
After they were superherofied in their capes and masks, we played a superhero game -- Superhero Teddy Bear Search and Rescue! This was a ridiculous idea I had to tie a bunch of stuffed animals in our trees and tell the kids that THEY ARE IN TROUBLE! They need a superhero to rescue them!
Here they all are, waiting to be rescued!
This was a very cute 60 seconds to watch. Cute, cute, cute.
Last on my crafty to-do list was this shirt. Just some simple applique! I did the hand-embroidery in yellow around the outside of the blue shape. Hard to see. Cute? Yes! But not that look on his face. I don't remember why he was sad at this point, because really, the day was a blast.
Or more like.... BLAST!
Linked at...
Labels:
birthdays,
family,
kids crafts,
mom stuff,
my boys,
non-sewing crafts,
sewing,
sewing bucket list,
thrifty
Thursday, June 2, 2011
Second dress for Summer of No Pants
A week ago, I told you I'd be fashioning my second skirt out of a green sheet I thrifted last month. I was all set to do that -- make another elastic-waisted skirt. But after completing my first skirt for The Summer of No Pants, I thought it might be nice to try something else.
Then I remembered the Maybe Matilda knockoff dress that is on my Sewing Bucket List. I thought the green sheet would be perfect for it.
So on Tuesday, in the middle of a grocery shopping trip, I popped into a used clothing store and grabbed a striped tank for $5. And voila, I had my my dress completed nearly before naptime even began! It really came together quickly, especially because I cut the sheet along the hemmed edge, meaning I didn't have to hem it myself. Oh, and I skipped the pockets this time.
Here she is, sans belt:
Totally done!
Or is she?
I have an idea, but I don't know how to execute it. That's life as a beginner sewer. I took the bottom half of the T-shirt, cut one seam open, positioned it around the neckline and pinned it. What do you think?
I kind of dig it. I want to attach it but here are my concerns: one, I don't have a ballpoint needle and have never sewn with knits. I assume that's essential -- the needle, right? Two, I'm scared I'll chop off the collar and then hate it and be stuck at a point of no return. Three, I'm just not sure how exactly to attach it. Sew all the way around? Just handsew it into place in a couple of spots? I'd love your advice.
I'm also not loving how.... busty this makes me look. Shoulda tried the shirt on before I bought it, but when you have three minutes and a three-year-old with you, you do what you can. I'm wondering how to tone down the bustiness. Might the flourish along the neckline do that?
Here's me modeling it as is.
The sash is another issue. I don't like the way it scoots up on me (see in the last photo?). I might sew it into place. Maybe just along the middle of the back. Would that work? I also wish I'd cut it a wee bit longer. It seemed long as all get out, until I tied it around my waist.
Overall, I love the look. It makes me feel French. We all want to feel French sometimes, right? I just want to tinker with it a bit. Please, give me your thoughts in the comments! And head over to The Summer of No Pants Link Party to see what everyone else is creating.
Then I remembered the Maybe Matilda knockoff dress that is on my Sewing Bucket List. I thought the green sheet would be perfect for it.
So on Tuesday, in the middle of a grocery shopping trip, I popped into a used clothing store and grabbed a striped tank for $5. And voila, I had my my dress completed nearly before naptime even began! It really came together quickly, especially because I cut the sheet along the hemmed edge, meaning I didn't have to hem it myself. Oh, and I skipped the pockets this time.
Here she is, sans belt:
Totally done!
Or is she?
I have an idea, but I don't know how to execute it. That's life as a beginner sewer. I took the bottom half of the T-shirt, cut one seam open, positioned it around the neckline and pinned it. What do you think?
I kind of dig it. I want to attach it but here are my concerns: one, I don't have a ballpoint needle and have never sewn with knits. I assume that's essential -- the needle, right? Two, I'm scared I'll chop off the collar and then hate it and be stuck at a point of no return. Three, I'm just not sure how exactly to attach it. Sew all the way around? Just handsew it into place in a couple of spots? I'd love your advice.
I'm also not loving how.... busty this makes me look. Shoulda tried the shirt on before I bought it, but when you have three minutes and a three-year-old with you, you do what you can. I'm wondering how to tone down the bustiness. Might the flourish along the neckline do that?
Here's me modeling it as is.
Standing at the doorway, peering snarkily into the distance. |
Sitting on a bench, looking mildly bored. |
Holding up a wall. |
Pretending to change a tire. |
Overall, I love the look. It makes me feel French. We all want to feel French sometimes, right? I just want to tinker with it a bit. Please, give me your thoughts in the comments! And head over to The Summer of No Pants Link Party to see what everyone else is creating.
Also linked at:
Labels:
clothing,
sewing,
sewing bucket list,
summer of no pants
Subscribe to:
Posts (Atom)