Tuesday, May 31, 2011

Quilted ruffle sun glass case tutorial!


I introduced this cute quilted ruffle sun glass case a couple of weeks ago. A few of you said you'd like a tutorial and so I finally stopped being lazy and put it together for you. Yay!

It's quick project to make, totally doable in one nap time. Assuming your kid is a nice two-hour-long napper like mine. And I think it'd be perfect for an end-of-year teacher gift. N'est pa?

Here's what you need:

4 rectangles of quilting cotton or home dec-weight fabric measuring about 8 inches by 4 inches. Two from your outer fabric and two of the inside fabric. 

2 pieces of batting 8 inches by 4 inches.

 2 rectangles of the outer fabric for your flap that measure about 8 1/2 inches by 3 1/2 inches. 

1 strip for the ruffle in the lining fabric measuring about 16 inches by 3 1/2 inches.

For your binding, 1 strip from your outer fabric 8 inches long by 2 inches wide. Or you can use store-bought bias tape. 

Optional: Either store-bought bias tape or made from your lining fabric, 20 inches, for the interior seam.

A snap for closing. And in my case, a glue gun. 

All the sewing essentials: thread, sewing machine, glass of wine.

Please note: when I made this case, I made it way too big. So the fabric rectangles you see below should look larger than the ones you're cutting. Really, you can size this up or down depending on the size of your sunglasses. As you can see, mine are large. This should fit those Jackie-O style glasses with ease.


1. Make your ruffle.

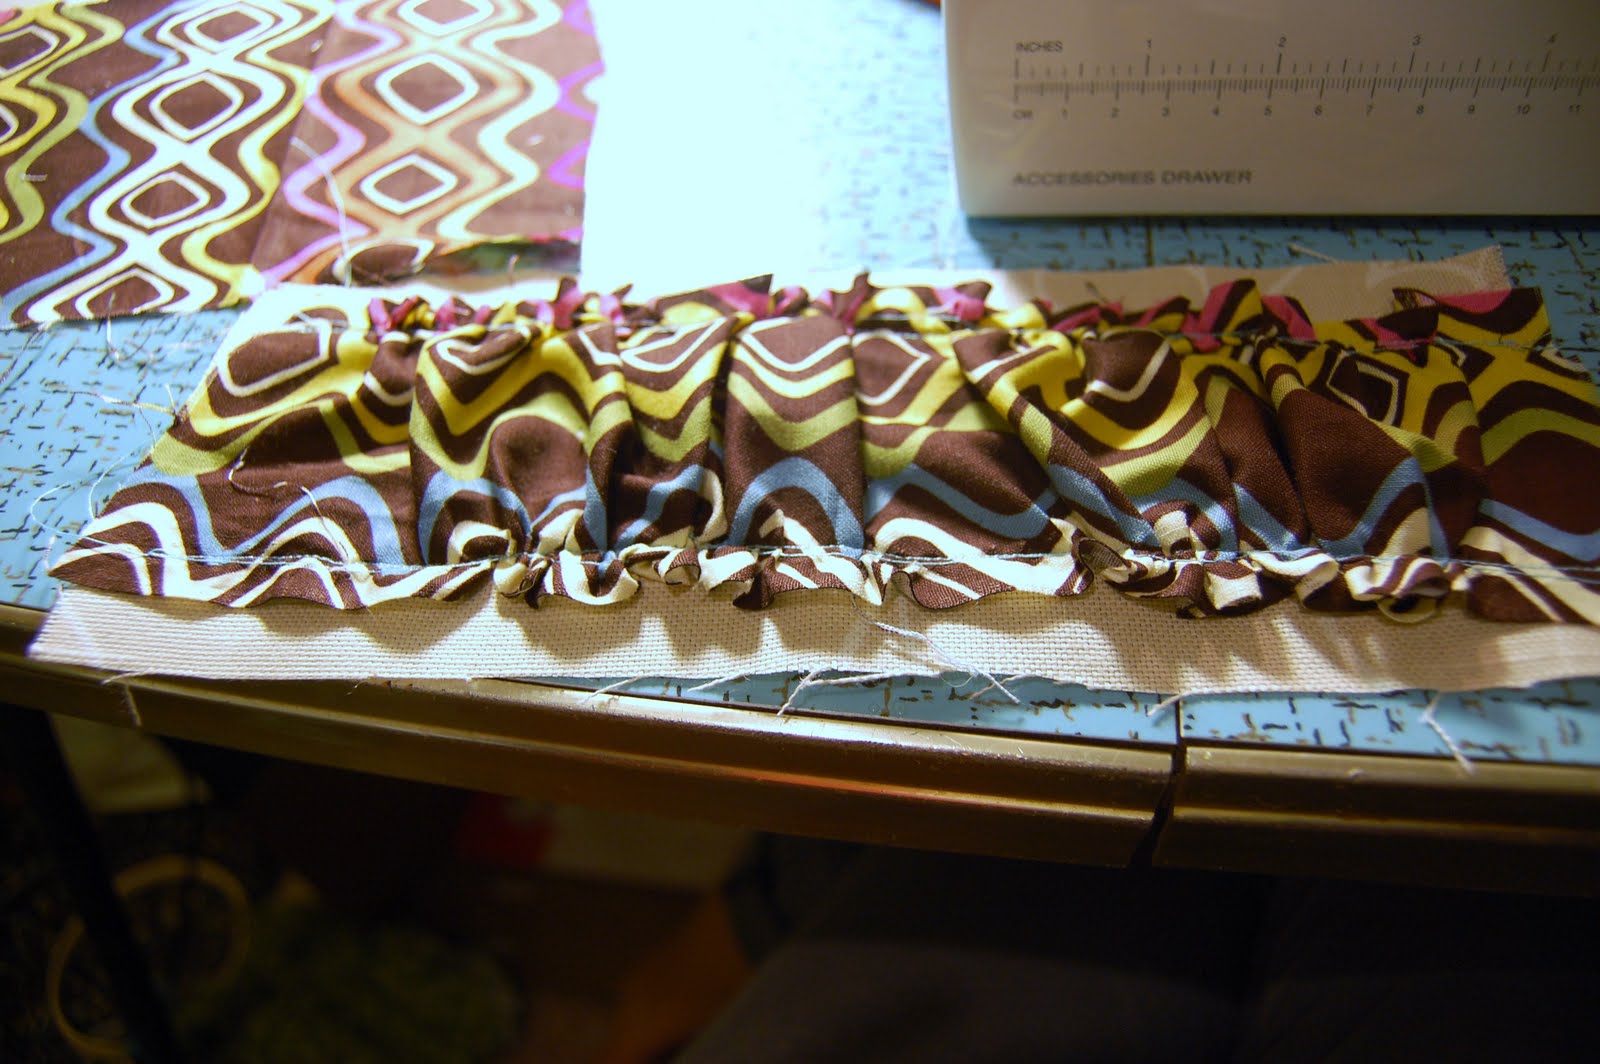
Take the long strip of fabric for your ruffle. Set your machine to its longest stitch length. Mine is a 5. With a 1/4 inch seam, sew down each long side of the fabric without back stitching at the beginning or end. Be sure to leave long tails of thread at each end. You're going to pull these to create your ruffle.

Now with each side stitched, find the thread on each corner that when pulled causes your fabric to gather. Gently tug that thread while pushing the fabric together. Make sure to pull evenly from each corner. Keep gathering the fabric until you have an 8-inch long strip.


2. Pin the ruffle with wrong-sides together to one of your flap pieces. Sew together, following your basting stitch line. NOTE: I didn't finish the ends of my ruffle. Before attaching to flap, you can finish your edges by serging the ends or doing a zig-zag stitch along each long end.


3. Pin the two pieces of fabric for your flap with right-sides together. Sew around both long sides and one short side with a 1/4 seam.


To get a nice, sharp corner, be sure to stop sewing with your needle down and lift your presser foot, then turn the fabric 90 degrees. Put your presser foot back down and keep sewing!


Once you're done, trim down a bit and snip the corners down almost to your sewing line.


Turn inside out through the open end. Your ruffly flap is all done!


4. Now, onto the main body of the case. Make a sandwich for each side of the case like this: lining fabric right-side down, then the piece of batting, then your outer fabric right-side up. Pin together well. Now quilt each sandwich. I quilted mine using a straight-stitch, eyeballing it as I went. I believe they were about 1/2 inch apart. And I went up and down the long way.


Keep on quilting! 


5. When you've finished quilting, square up your pieces. Trim any uneven spots and make sure the two pieces are the same size.

Here are mine after I've matched them up and trimmed a bit away, all the way around.


6. Now pin with right-sides together. Your lining sides should be facing out. Sew around the case starting at the top of one long side, going around one short side and back up the other long side. Leave one short side open. 

When you turn it inside out, it should look like this.


7. I don't have a photo of this step. Sorry! I actually went back and added this later. You can leave your inside seams unfinished. But I wanted them to look a bit more polished so I added double-fold bias tape. Simple sandwich the seam inside the bias tape and then sew around. Since this won't be visible from the outside, I wouldn't worry about hand-stitching this binding on.

8. OK, now to make the binding! Take the small rectangle you cut for your binding.


Iron it in half lengthwise.

And then open up and iron each side in toward the middle. Like this.


This is your homemade double-fold bias tape.


9. Pin the flap into place with the ruffly-top sandwiched between the flap and the case. Like so.


Now open your bias tape and pin it around the outside with the wrong-side up and the top edge of all layers aligned. 

You want to machine stitch this together just inside of the right-most crease in the above picture.  The first crease in from the edge where all your layers meet. Go slowly and try to stay just inside that line as you sew all the layers together.

10. Now the last step!

The first time around, I did thinks the quick way. I fold my bias tape over and pinned it along the inside of my case . Then I machine stitched it together. Like so:


You can certainly do that. But I really hated the way it looked. So when I wound up resizing my entire case -- by chopping off the top and starting over with a new binding -- I decided to do the last step by hand. It's so much easier to get a nice looking binding that way. I recommend it. 


And then you're done!

Oh wait. What's that? A snap? Ah yes. I forgot to add a snap to my case until it was all put together. So at the last moment, I used my glue gun and glued one into place. And you know what? It works just fine. If you want to sew yours in, you need to do that before you sew your two sides of the flap together and before you sew the two sides of the quilted case together. But you have my permission to be lazy and just glue that bad boy on there.


And if you have a cute flower pin sitting around, begging to be the finishing touch on some project, certainly add it, as I did! 

Hope you enjoyed this! Please, if you have questions, let me hear them. And if you make one for yourself, I'd love to see a photo of it! Drop me an email at tharshesews @ gmail.com or leave a comment with  a link to your blog.

Linking up at...


Photobucket

Sunday, May 29, 2011

Gallery wall progress, update 1

I've mentioned a few times now that I'm working on a gallery wall for our dining room. I'm getting some progress done on that and thought I'd share!

First off, here is the dining room as it looks now.


 As you can see, I didn't even pick up to take these photos. Lazy, aren't I? And how sweet is my husband? There he is giving our son breakfast while I do this nonsense. And that beautiful arrangement of flowers? My anniversary present! We had our five-year anniversary on Friday, and he always gets me a bouquet in our wedding colors (pink and orange). Sweet, eh? He's a keeper.

Anyway, so here you see the two bare walls of my dining room. I am still not sure which wall should get the display. The first photo is the wall you can see from the adjoining family room, so my first thought was to put it there. It would get the most notice. Any opinions? The other wall is something you see from the kitchen door and the hallway.


Here's my collection of frames, all painted white. That large one came from a garage sale last weekend for $5. Niiiice. What do you think of this arrangement? Just trying stuff out! My husband thinks they are too close together, but I'm thinking that's how a gallery wall is supposed to be. Thoughts?

I'm not sure whether I want to add a few more frames or not. And then there is the biggest question of all: what is going in all of these frames? I honestly don't know. I've thought about just doing photos. I've thought about buying a bunch of art prints. I've thought about doing some DIY using fabric. Or a mix of all of the above. I'm melting in a pool of indecision here. But I am collecting inspiration -- prints I like, photos I might use. Want to see?

Here's a collage that includes a bunch of photos I've taken. I tried to single out pictures with a lot of blue or orange, since that's our family room/dining room color scheme. If I did all photos, I could select up to 10 of these. Or I could just pick a couple.


I think I am more likely to do prints or a mix than all photos, though. I've been scouring etsy and 20x200.com for prints I love. Here's what I've "pinned" via Pinterest so far.

Owl No. 1 from 20x200.com

Chili dog with everything via etsy.com

Metro Detroit Map via etsy.com

Teapots A4 print via Etsy.com

Coffee Time Mixed Media canvas on Etsy.com

Ideal bookshelf from 20x200.com

In the Library on Etsy.com

Typewriter print from Z Gallerie
OK, I love them all. And they all have something meaningful to me, which is the best part. Things we love, places we love, things we love to do. I'd love them all, but that would add up to some big bucks. So I'd need to pick and choose my favorites. So dang hard!

For the oval frame, I'm thinking a DIY silhouette is in order. I wonder if I could squeeze both boys' heads into one frame? And for the largest frame, if I decide not to go with a purchased print, I think doing something DIY could be a good money-saving option. But what?

I'd love your feedback! What makes for a good gallery wall in your opinion? I'm hoping to have mine done in the next couple of weeks. We're hosting a family party on June 12. That means I need to make decisions now if I'm going to order anything. So please, help me get off of indecision island!

Friday, May 27, 2011

First skirt complete for SONP!

Before we get to my first skirt, here is Luke, obviously thrilled with the adorable hat I made him. Just thought I'd share that so you can see it actually fits! Yay!


And again, thanks to Anna from Noodleheads for being my first interview subject for The Sewing Circle series! To read Anna's thoughts about sewing, click here!

OK, onto the skirts!

I knocked out my first skirt for The Summer of No Pants in two hours Wednesday afternoon. All hail naptime! Both kids actually slept for three hours. It was a-MAZ-ing! And it felt good to get my first skirt done.

Let's take a look!

It's the skirt from the My Growing Home tutorial. Like, the exact same skirt. Same fabric anyway. And I followed the tutorial nearly exactly, except for a few small things.

For one thing, I only had 1 inch elastic on hand, so I used that instead of 1.5 inch. I wonder how big of a difference that makes. The skirt doesn't lay as well as I'd like in front. It billows a little, making for an unattractive "front-butt" look, if I'm not minding it and flattening it and readjusting it constantly.


 I also think I might take it up a bit. I don't know if this lenth really flatters me much. Although I guess it is more practical if it is longer, right? Decisions, decisions!

The only problem I had with the tutorial came on the final step. Instead of sewing between two marks one way, I sewed the other way. Like, I sewed the sides instead of along the front. This meant I had to get creative when I inserted my elastic into the casing, and leave one-inch gaps along the sides of the front. This is hard to describe, and you probably have no idea what I'm talking about. In the end, the mistake really didn't matter much, so let's just leave it at that.


Ooooh, and this skirt is my first with pockets! Very easy to add. Love having pockets. My only concern is that they don't always lay correctly. Maybe I just need to iron some more, eh?

So there you go. One skirt down. Three to go!

Link parties I'm joining.

Thursday, May 26, 2011

The Sewing Circle interview with Anna from Noodlehead!


I'm a journalist at heart and by trade, and so I very much want there to be an aspect of that here on my blog. And so I've asked a few of my favorite bloggers who write about sewing to let me interview them. I'm calling it The Sewing Circle -- a chance to get to know the people behind the sewing projects we love to ogle and tutorials we adore. My first guest is Anna, the brains behind the immensly popular blog, Noodlehead!


Anna's was one of the very first blogs I found when my sewing obsession began. I just love her style. Her projects are approachable, perfect for a beginner like me, but still deliver a wow-factor. Her sewing tutorials directly inspired me to go to Target and throw a sewing machine into my cart, despite not knowing a basting stitch from a zig-zag stitch. They were just that pretty. I had to give it a try.

And I had to ask the girl with more than 9,000 followers if she'd come chat with little old me. Isn't it awesome when you discover the people you really admire are as nice as you expect them to be? I love that.

So here we go!

Q: I read that you first learned to sew as a little girl beside your mother. When in your adult life did sewing become a serious pastime?
A: I’m pretty sure it started more seriously when I escaped from the house one day to go to a bookstore on my own.  I was digging through the crafts and sewing section and found Jenny Ryan’s Sew Darn Cute book.  I went home, ordered the book, and the rest is history.  I remember scouring the resources in the back of the book and that’s where I found some awesome online shopping and lots completely amazing blogs!  

Q: When did your blog begin? What inspired you to start it? I read somewhere that the craft blogs did it for you... Any one or two in particular?
A: I started it a few times two summers ago (2009), and I guess I mean that I tried a few posts at first, nothing really serious and then I just decided to go for it.  I remember thinking that I surely wasn’t going to write and blog about things if nobody was ever going to read it!  I know for sure Made by Rae and MADE were some of the very first blogs I started reading.

Q: You have more than 9,000 subscribers/followers now. How deliberately did you grow that following? 
A: Yeah, it’s really kind of nuts.  I really never imagined this many people would want to read about what I make. But I did want people to share the fun with, so I made my first tutorial, the zippy wallet and then did a giveaway -- two really fun ways to draw some readers in.  The other way to attract readers is to leave lots and lots of comments on other people’s blogs.  You meet so many great people and it’s fun to build relationships.


Q: Your projects always look so well made to me. Meticulous really! Do you consider yourself a perfectionist when it comes to sewing? 
A: Hmm, I guess that depends on who you ask, but no, I really don’t consider myself a perfectionist.  I do try my best, but when it comes down to a project I’m not one to whip out the seam ripper if things get a little crooked.  I think lots of pressing, steam, and starch always make a project look better.

Q: How have you honed your skills? Taking a class? Just hours at the machine?
A: Yep, lots of hours at the machine.  And I really have only taken one class at my local quilt shop – for free motion quilting, but I ended up learning on my own before the class started.  I think most of the techniques and skills I’ve learned are from other bloggers.  I love trying out new things and new tutorials, so it’s definitely a great way to build knowledge.

Q: What do you find yourself thinking about while you sew? (I ask because for me, it is a unique experience… Sometimes I am focused so completely on the project that I lose all track of time and everything going on around me. But at others times, I find I do my best “deep” thinking about concepts and issues in my life. I really love both of those feelings and wonder whether other people who sew experience them!)  
A: That’s super interesting because I’m a thinker when I sew.  I don’t focus too much on the sewing and what I’m doing itself.   It’s usually a quiet time for me to relax and just enjoy the long stretch of uninterrupted focus.

Q: What’s your biggest piece of advice for a novice sewer?
A: Keep trying new things, don’t be scared of trying something you’ve never done before, even if you make a mistake (or lots), you learn so much from them.

Q: When do you find the time to sew? Do you sew every day?
A: I usually only sew at night when the girls are in bed.  I don’t usually watch much tv, but I also stay up pretty late sometimes.  And lately I’ve only been sewing 3-4 times a week, but it really depends on how motivatedI feel.


Q: When did you make your first quilt and how was that experience?
A: Ha, that’s good.  I made my first quilt from Sew Darn Cute, the spumoni quilt.  I followed everything to a ‘T’.  I love how it turned out, but wish I would have been a little more handy with a walking foot back then (and wish I would have bought a quality one)!  You can read about it here. ps, it also helps that the pictures are pretty small, otherwise you’d see how the fabrics pulled without a descent walking foot.

Q: Do you have a favorite quilt you’ve done? If so, why is it your fave?
A: My favorite quilt is this one:  for two reasons, one being that the fabrics are just beautiful and soft, the other being that it was made as a gift and I love making personal and usable gifts like quilts.

Q: You've written that you love attaching a binding by hand. What is it about that activity that you love?
A: Nothing really secretive, but just being able to sit on the couch and watch a movie with my husband and still be productive.  I also love being cuddled up under something that is almost finished!


Q: Many of your tutorials and patterns are for adorable handbags, totes, pouches.  How did that become your niche?
A: I’m not really sure I guess.  I have some sort of weird fascination with zippers.  I love that you can make really useful and pretty things.  And most of the time I can’t stand store bought versions because they just look so cheap!

Q: I love the way you mix neutrals, often in linen form, with bright cotton prints. How did that style develop? A: I just love linen.  It’s just a nice resting spot for the eye.  Mostly influenced by blogs like Pink Penguin and I heart linen.

Q: What's your go-to place to shop for cute fabric? 
A: I have lots!  I really do love my local quilt shop though, seeing fabrics in person is always so much better (but at the same time not as friendly on the budget, hehe).  Plus, they carry a lot of the modern designers and even cool Japanese prints! I also love it when I get to visit Crafty Planet in Minneapolis.  Online shopping I love: Pink Chalk Fabrics, Hawthorne Threads, Sew Mama Sew, and Fabricworm, but there are tons of others I frequent!

Q: What’s on your sewing bucket list? A project or technique you want to attempt, but haven’t?
A: I have a very long to-do list that I keep tucked away most of the time, but I’m really wanting to make a quilt for my own bed and a t-shirt quilt made up of my old swim shirts!

Q: Following up on that, what are you waiting for?
A: I always ask myself that (mostly because I think the hardest part is getting started on a project, I usually like to let things roll around in my head for a good long while).

Q: OK, one non-sewing question! I read that you swam competitively for 12 years. I did so for 10! Yay swimming! What was your best event, and do you still swim now?
A: Yay, yay yay!!! I’m so excited that you were a swimmer too!  It’s so awesome to hear that as it seems like forever since my swimming career ended (after college).  I really haven’t swam much at all, but I think this summer would be a great time to start swimming laps at our local pool!  How about you? Where did you swim?  I swam from the La Crosse (WI) YMCA and then swam from the University of Wisconsin – La Crosse, I got to travel to so many cool places and it’s also where I met my husband (in a round about sort of way). 

That's it! To answer Anna's question, my 10 years of swimming only took me through high school. I swam for our high school team and for a summer team at a country club. At times, I wanted to be on the Y team, but my parents didn't want us to take it so seriously, I don't think. Although I usually begged and got my way if it was something I really wanted, so I must not have wanted it that badly. It's funny though because sewing and swimming have some things in common... I used to spend my time swimming laps thinking about all sorts of things. Now sewing is that time for me, when my brain gets a chance to work through things. Love that!

Thanks so much to Anna for taking the time to answer my questions. As a blogging newbie, this was exciting for me. I have two other fantastic bloggers lined up and hopefully will continue this Sewing Circle at least through the summer. So if there is someone you'd like to see interviewed, please suggest them!


Linking up at....

Weekend Bloggy Reading