Showing posts with label gifts. Show all posts

Saturday, March 31, 2012

Owl burp cloth tutorial


You know how when you're pregnant, you're not really supposed to say if you want a boy or a girl? The correct stance is: as long as the baby is healthy, I'll be happy. As a mom of a baby who was decidedly not healthy at birth, I get this, totally. That said, I'll admit: the first time I found out I was having a boy, I felt disappointed. I think to some degree, we ladies all want a baby girl, a daughter who will grow up and share things with us that boys just can't. I'm totally happy with the way things worked out for me with two adorable, sweet, smart little boys. But the wanting-a-girl thread is still in there something deeply buried. I know this because when I found out my sister-in-law is pregnant with a baby girl, I squealed and basically skipped around the room in excitement. A girl! A niece! My first. I'm so very excited. 

It's fun to make little girl things at the sewing machine. Here's my first project for my niece, due in May.
An owl appliqued burp cloth! I guess some people never use burp clothes because I suppose their children are perfect little creatures who never regurgitate anything. Mine were quite the opposite. I went through at least one a day. I suppose I hope it runs in the family!


For this project, first I cut three rectangles of fabric and sewed them together with about a quarter inch seam. Iron those seams flat and then fold the new long piece of fabric down the middle. I use another burp cloth I like as a pattern. I love burp clothes in this oversized bone shape. They fit on your shoulder well and cover a nice portion of your back, which is nice when the adorable baby really lets it fly. 

After getting the top done, I turned to the owl applique.


I freelanced a pattern by cutting and play with the pieces. For mine, you need an ovalish body, a smaller oval for the belly, a half-circle for the face, two oval-shaped eyes and the wings. I cut the shapes and then ironed them onto medium-weight interfacing and cut them out. The interfacing makes the applique process a little sturdier and also, I hope, will prevent from fraying of the ends.


First I sewed on the body around the edge with a straight-stitch. You could also use a zig-zag, but I went for straight stitch with everything on my owl. After the body, I sewed the face on top, overlapping the body slightly.


I then placed the wings and sewed them only along the inside edge. You'll sew the outside edge down when you attach the owl to the burp cloth. 


Finally, I sewed on the eyes. The left one looks better because I took it really really slowly, hand-cranking the stitches for the most part and rotating the fabric every two stitches.


Here's how our little owl looks ready to be appliqued on!


Then it's simple. Place Mr. Owl in the middle of the burp cloth and sew around him using an edge stitch. And the top is done!


I backed my cloth with white terry cloth. I used my top as the pattern, placed the two pieces right sides together and sewed, leaving a hole for turning on one end, with a quarter-inch seam. Turn right-side out, iron very well, and then top-stitch around, being sue to close your turning hole. And you're done. One cute owl burp cloth for one, I'm sure, very cute niece.


Monday, January 23, 2012

1-2-3 Sew Craft Tote


My best friend turns 32 today. We've known each other since we were 18. That's 14 years, apparently. Fourteen years! We've seen one another grow up, fall in love, get married and start careers. We've supported one another spiritually. We've run half-marathons together. We've done a lot of laughing together. And I've received too many hand-made gifts from her to count. She's a knitter, and a fine one, and at least once a year for the last seven or eight years, she's gifted me some wonderfully hand-knit item. It was about time I returned the favor!


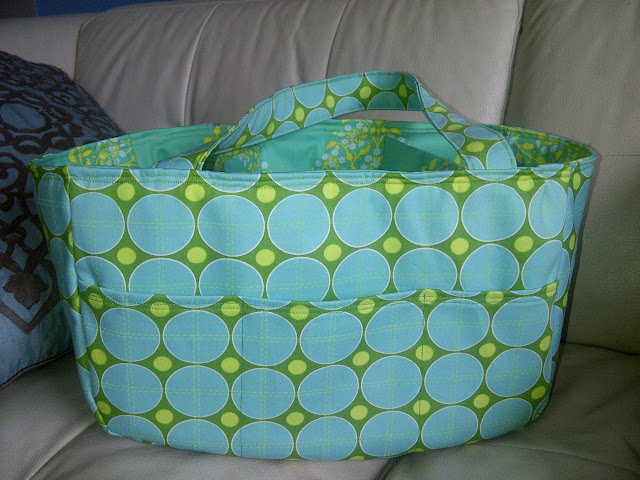
I saw this craft tote tutorial in the book 1-2-3 Sew and decided it'd be great for her to carry her knitting supplies around. The fabrics are from Amy Butler's new "Lark" line of fabric. They're home dec weight. The tutorial calls for canvas, so right away, I had a problem. But it was not too hard to solve. I lined all the outer pieces, the inside bottom piece and the compartment dividers all with fusible fleece. That seemed to do the trick, and the bag sits up nicely and holds its shape.


 I did have to go back and readjust my seams on the lining pieces multiply times, because when I went to fit it inside the shell, it was bunching up. I don't know why -- I swear I cut accurately this time. But what can you do? Taking the seams in a bit here and there worked well, and for the most part, the inside lays nicely in the shell. I love all the divided areas, perfect for stashing different crafting tools!


It also has three divided pockets in the front, for extra storage options. And while the tutorial called for straps made out of webbing, I decided to make my own from the fabric. They also have a bit of fleece inside. Saved me a trip to the store more than anything, but I think they're cute, too.

This bag took me about a week to make, but only because my sewing time is so limited to little bursts here and there. It was a very straight-forward project. A great first project to try from his new book!

Happy birthday, Kelly! Hope you love it!

Linked up at....


Creative ItchSew Chatty

Friday, January 13, 2012

A potholder for a friend


I made this extra-large potholder for a friend this week. On New Year's Day, hanging at her house, she brought out a Calaphon Dutch oven and an indoor grill pan, both of which she was no longer using. She said I could have them. I was thrilled because those are two pans missing from own kitchen. Score!

I decided to make her something to thank her and landed on this potholder thanks to a new email rolling into my inbox each day. It's called the Sew Can She Newsletter. They deliver one sewing tutorial to you each day. Free! Not bad, right? The tutorials come from all over blog land, and you can submit your own to be considered. It's just another easy way to find inspiration and tutorials you might otherwise miss. So last week, the email include a potholder tutorial that used this exact same coffee cup fabric! I had it in my stash awaiting some sort of inspiration, so I took it as a sign and whipped this up. I didn't use fusible thread, as the tutorial calls for, but that's a good idea I'll have to look into. And I just did some straight-line quilting with a zig-zag stitch thrown in.

Hope my friend loves it! The finished size is about a 10-inch square, which is really large. Nice for use as a counter-top hot pad, too!

Oh and hop over to the blog Boy Oh Boy Oh Boy! Stacey is gearing up for a year-long Sewing for Boys sew along! Fun! They featured one of my Henry Shirt posts this week. Thanks for the invite, Stacey!

Thursday, January 12, 2012

Swimming in wonderful new things

I've been a lucky girl this week when it comes to getting awesomeness in my mailbox or on my doorstep.

First, this.


These four books came as a Christmas present from my friend Kim. Is she way too generous or what? I could not believe it! So many projects to contemplate, my head is about to explode. Do you have any of these books? Where should I begin?! (And I should say, I do have the One Yard Wonders book already. Contemplating exchanging it, maybe for the new One Yard Wonders book, or hosting a giveaway with it. Decisions, decisions.... :) )

Then this came yesterday.


New fabric! Some solid fat quarters, because I never have enough solids in my stash, and two yard-cuts of fabric from Amy Butler's Lark collection in home-dec weight. I have a plan for that! And the top is a fat quarter collection with various fabrics. I have something in mind for those too, and it just might involve a baby girl headed my family's way in the spring. Meaning, I'm going to be an aunt! So excited!

I'm struggling to find/make the time to actually sew right now. But hopefully, all these new goodies will be a nice kick in the pants.

Has the mailman brought you anything this lovely recently?

Happy Thursday all!

Tuesday, January 10, 2012

The saga of the apron. And I do mean saga.

Is there an award for being the last one on Earth to finish a handmade Christmas present? If so, I win! I win!


This is the finished apron I finally gifted by mother-in-law today. Months and months ago, she mentioned that she'd like if I made her a holiday apron. We're always struggling to come up with good gifts to give her, so I was happy to have the inspiration handed to me. I knew from that point on -- maybe sometime in October -- that I'd make her her holiday apron for Christmas.

I started thinking about fabric and patterns. At Jo-Ann's one day, I put this in my cart, 40% off. McCalls 6177.

I thought that third look was it. Cute, right? Then I read the instructions and sort of freaked out. I began to worry that it was too difficult a pattern in the time I had. And then I noticed that I bought sizes 18 wide and larger. Rookie mistake. My mother-in-law is basically the same size as me. So I had to go another route.

At that point, I opened up the book One Yard Wonders for inspiration, and I decided to make the Cottage Apron.


Kind of cute, right? Kind of.... sexy? I liked this a lot, I just felt like.... Is a woman in her 60s really going to like this? It didn't seem like her. I also started questioning having straps made out of ribbons. Is that really going to hold up in the wash?

As you can see, I was second-guessing everything.

On Christmas Eve, at 10:30 p.m., my mind scrambled in a haze of last-minute present wrapping, I decided there was no way I could give her Apron A. So I set out to make another.

I had a yard of fabric in a festive print. I had red linen. I quickly cut out an apron, using another I had as a pattern. I cut straps, including one very wide and long strap to go across the middle. I hemmed all the sides, made some straps, and voila, before you could say Merry Christmas, I had a new apron!

But wait!

So I gave it to her. She said she loved it. It was all fine. Except I put the sash on way too low, so it hit around the hips, and so the sides of the back hung in a sad droopy manner. I had stitched the strap right to the top of the apron, so I told her it would be no biggie for me to take it home and move it up higher. I was disappointed that it wasn't perfect, but hey, I still think I made the right call and made an apron more suited to her. And I could fix it.

And then. And THEN.

Do you feel the drama building?

If you're squeamish... Maybe you will want to skip this next photo. Because I am sure I am about to break all sorts of blogger rules in posting this photo.

What happened AND THEN is that I brought the apron home, and when all the holiday fun cooled down, I un-stitched that baby. And then the next morning I laid it out on the floor to pin the sash back on. The clock was ticking. She was coming to babysit soon.

I walked upstairs to get more coffee. And when I came back.... I saw this.

I won't enlarge it more than that, because ew, gross! Ladies and gentlemen, that's what it looks like when your cat decides your unfinished sewing project -- a project for your mother-in-law --  looks like a great place to barf.

My husband was all: "Just wash that spot off!" Oh darling. No. That sucker had to go in the wash. Which meant it wasn't done by 11:30, when she came over to babysit. Which meant it was another week before I'd see her again to have a chance to give her her apron.

So finally finally this week, I finished her up. And presented a fully finished, non-barfy, non-teeny-bopper apron to my mother-in-law. On Jan. 10! Only 16 days after Christmas!

I had to make my husband model after his wipe-the-barf-off-the-corner comment.

 Hahaha.

Here it is on me, looking ladylike in my pajamas.

I


Moral of the story: don't leave your sewing projects near a barfy cat? Don't wait unitl 10:30 p.m. on Christmas Eve to attempt a sewing project that is actually a good fit for your recipient?

That's for you to decide. All I know is this: my mother-in-law seems pleased enough with her new apron (and yes, she knows about its sordid past) and bonus, my friend Evelyn was so taken with my first apron, she bought it from me! I am now contemplating what to make her to thank her. Irony! Whatever I decide, I'll try not to let my cat near it.
Linked at...


Photobucket Weekend Bloggy Reading

Saturday, December 31, 2011

Last handmade gifts!

I have been on a major French press kick lately. My drip-coffee pot just wasn't giving me as deep a flavor as I wanted. And my mornings are slow and laid back these days, so it is nice to take the time to boil water and steep and press the coffee myself.

And look! My friend Jen made me this adorable sweater cozy for my press! It's made from a thrifted little girl's sweater. Isn't it adorable? And it serves a great function, too, keeping that precious coffee warm while you enjoy your first cup and wait for the second. What a sweet Christmas present!

We had breakfast out yesterday and exchanged our handmade gifts. For her, I made something near and dear to me -- a covered notebook! I love a brand new notebook, as I've said, and especially around the New Year when all sorts of resolutions, reflections and goals are bouncing around your head. You need to write that stuff down.


Now she has a place to do so! And I had to show it all wrapped up, because that donut wrapping paper is my favorite.

Happy New Year everyone! I might be back later to share my favorite photos of 2011. It will be a most self-indulgant post. And I'm not going to apologize for it at all. Cheers!

P.S. Also, I changed my header. Thoughts?

P.S.S. I really love this article: 12 Things Happy People Do Differently. I hope to do all those things more often in 2012. Especially No. 1. And No. 8 -- experience the flow -- that's sewing for me. So more sewing in 2012, too!

Monday, December 12, 2011

Oliver + S Puppet Theatre help needed!

First off, it's Sew Mama Sew giveaway day! It's an event where tons of different sewing blogs host giveaways of handmade items and supplies. Go explore, find new blogs and enter to win prizes. I will be!

Now, I need your help.


I am trying like hell to get my Oliver + S puppet theatre done in time for Christmas. I've been slowed once again! This time because my machine is acting super weird. I'm applying the ribbon frames around the windows. It's such a darling effect. But it's driving me mad. My thread unthreads itself on basically each and every pass through a ribbon. It is slowing me down so much, and I can't figure out what's going on. Something with the tension? Wrong needle? Why would the thread unthread itself from the needle? How is that possible??

Please help! I have two windows left to finish, and I'd love to solve this problem and fly through them. Any ideas what might be wrong?


Wednesday, December 7, 2011

Merry and bright... and really really busy

Sorry I have been a bit MIA. It's that time of year. I'm sure you're feeling it, too. So many things to do during the holidays. Does anyone else wonder why we try to cram so much into a few short weeks?

The last few years, I've taken a week off in early December to try and get all my shopping, decorating, mailing and baking done. I am now working just part-time, but decided to keep the tradition alive. It's nice to have so much out of the way early in the month. So I have been off for an entire week now and don't work again until Sunday. I wish I had more sewing done in this time to show you, but mostly, I've just been checking other holiday stuff of my to-do list.

Here's a big ol catch up post to show you what I've been up to. 

We got the tree up yesterday! We get a real tree. I love it but man, it's a lot of work. Getting the tree is truly an all-day affair, and we're not chopping it down or anything. Just picking it up in nearby parking lot. But anyway, it's up and I love it.

 I made this wreath yesterday. Super easy. We can't do a green wreath anymore since we painted the door green this summer. So I thought red might be nice. All I did was wrap a wreath form in red yarn, hot glue some small ornaments in one corner, and attach a wreath bow in the other. I plopped that twig of silver balls in for the last touch. Super fast to make and cost about $12 for all the supplies (I already had the wreath form.)

On Saturday, my Mom and Aunt and I went shopping in Detroit. It was a great day. I'm still planning to show off the stuff I bought at the Detroit Urban Craft Fair!  I forgot to take photos all day though, except for this festive light display in a store front downtown. So I need to snap some shots of what I bought, then I'll post!


On Sunday night, we took the kids to the Wayne County Lightfest. Which mostly, they slept through. But it was something I've been wanting to see for years. It's a 5-mile long road with more than a million Christmas lights set up in elaborate displays. It's about a 30-minute drive for us, but worth it. I hope when the kids get older they enjoy it more.


 On Monday, we hit up the mall to see Santa. If you want a professional photo with Santa, it's $30 at our mall. Or it's $5 if you want to take your own. An easy decision, if you ask me!


I also made our Christmas cards. I feel like a flipping genius this year, because I made this custom photo card and printed 75 of them -- for $5! I just used Picasa to make a collage and Snapfish to order .09 cent prints, which I might stick to a piece of cardstock. Or not. I am pretty excited about this though. $5?? I feel like an idiot for ordering such expensive cards in past years!


I've been working on a tutorial for the Scarflette! I hope to have it finished next week, which still leaves some time to make one or two or five for your friends for Christmas. Stay tuned!


And tomorrow, my ornament will be featured in the Sew Woodsy 12 Days of Christmas event! I thought I was Friday, but nope, it's tomorrow. This is actually the back of my ornament. Just wanted to give you a sneak peak.

So that's what I've been up to. How about you? Are you ready for Christmas?